Sunday 20 August 2017

My New Toy: Refractometer (and bonus Christmas Cider recipe)

A couple of weeks ago, I was looking through Google Plus communities and I came across a post on using a refractometer for measuring sugar concentration (i.e. Brix). For me, this was a lightning bolt. I didn't need to read anything beyond the title of the post to know exactly why I wanted my own refractometer and why. I immediately started looking online, and found out that Lee Valley Tools in Edmonton had one in stock, advertised as a "Sugar Tester", priced at $76.50. I acquired one the next day.

Portable Refractometer. The item came with a case, an eyedropper, a small
screwdriver (for the calibration screw), instructions, and a cleaning cloth.


A refractometer measures the index of refraction of a medium. The index of refraction, n, is the ratio of the speed of light in a vacuum compared to the speed of light in the medium of interest. For example, n for water is 1.333, which means that light travels 1.333 times slower in water than in a vacuum. Refraction is when light "bends" on entering a medium with a different n. When I described this to my daughter, she immediately gave the example of looking at a plastic straw in a glass of water - it looks like it's bent.

The key thing to know is that sugar solutions have a larger n than water. And, if you increase the sugar concentration, n increases. This can be calibrated and you can use a relatively simple optical measurement to determine sugar concentration, as opposed to measuring specific gravity with a hydrometer.

Personally, I find the measurement of specific gravity with a hydrometer to be a chore. For one, you need to sanitize the hydrometer and the cylinder or wine thief used to hold the liquid during the measurement. So, every time you want to measure s.g., you need to sanitize stuff. Second, hydrometers are made of glass, so they are fragile and it's no fun if you break one by accident. Third,  s.g. measurements are a bit imprecise due to the size of the meniscus relative to the calibration marks on the hydrometer. And, if there are bubbles stuck to the hydrometer, the s.g. reading will be higher than it should. You need to measure s.g. two or three times to make sure the reading is consistent.

Measuring Brix with a refractometer is just simple. All you do is place a few drops (yes, DROPS) of liquid on the prism, close the "daylight plate", and look through the eyepiece for the reading. In this particular refractometer, the dual scale is given in Brix and "Approximate % of Alcohol". The images below show what you see in the eyepiece.

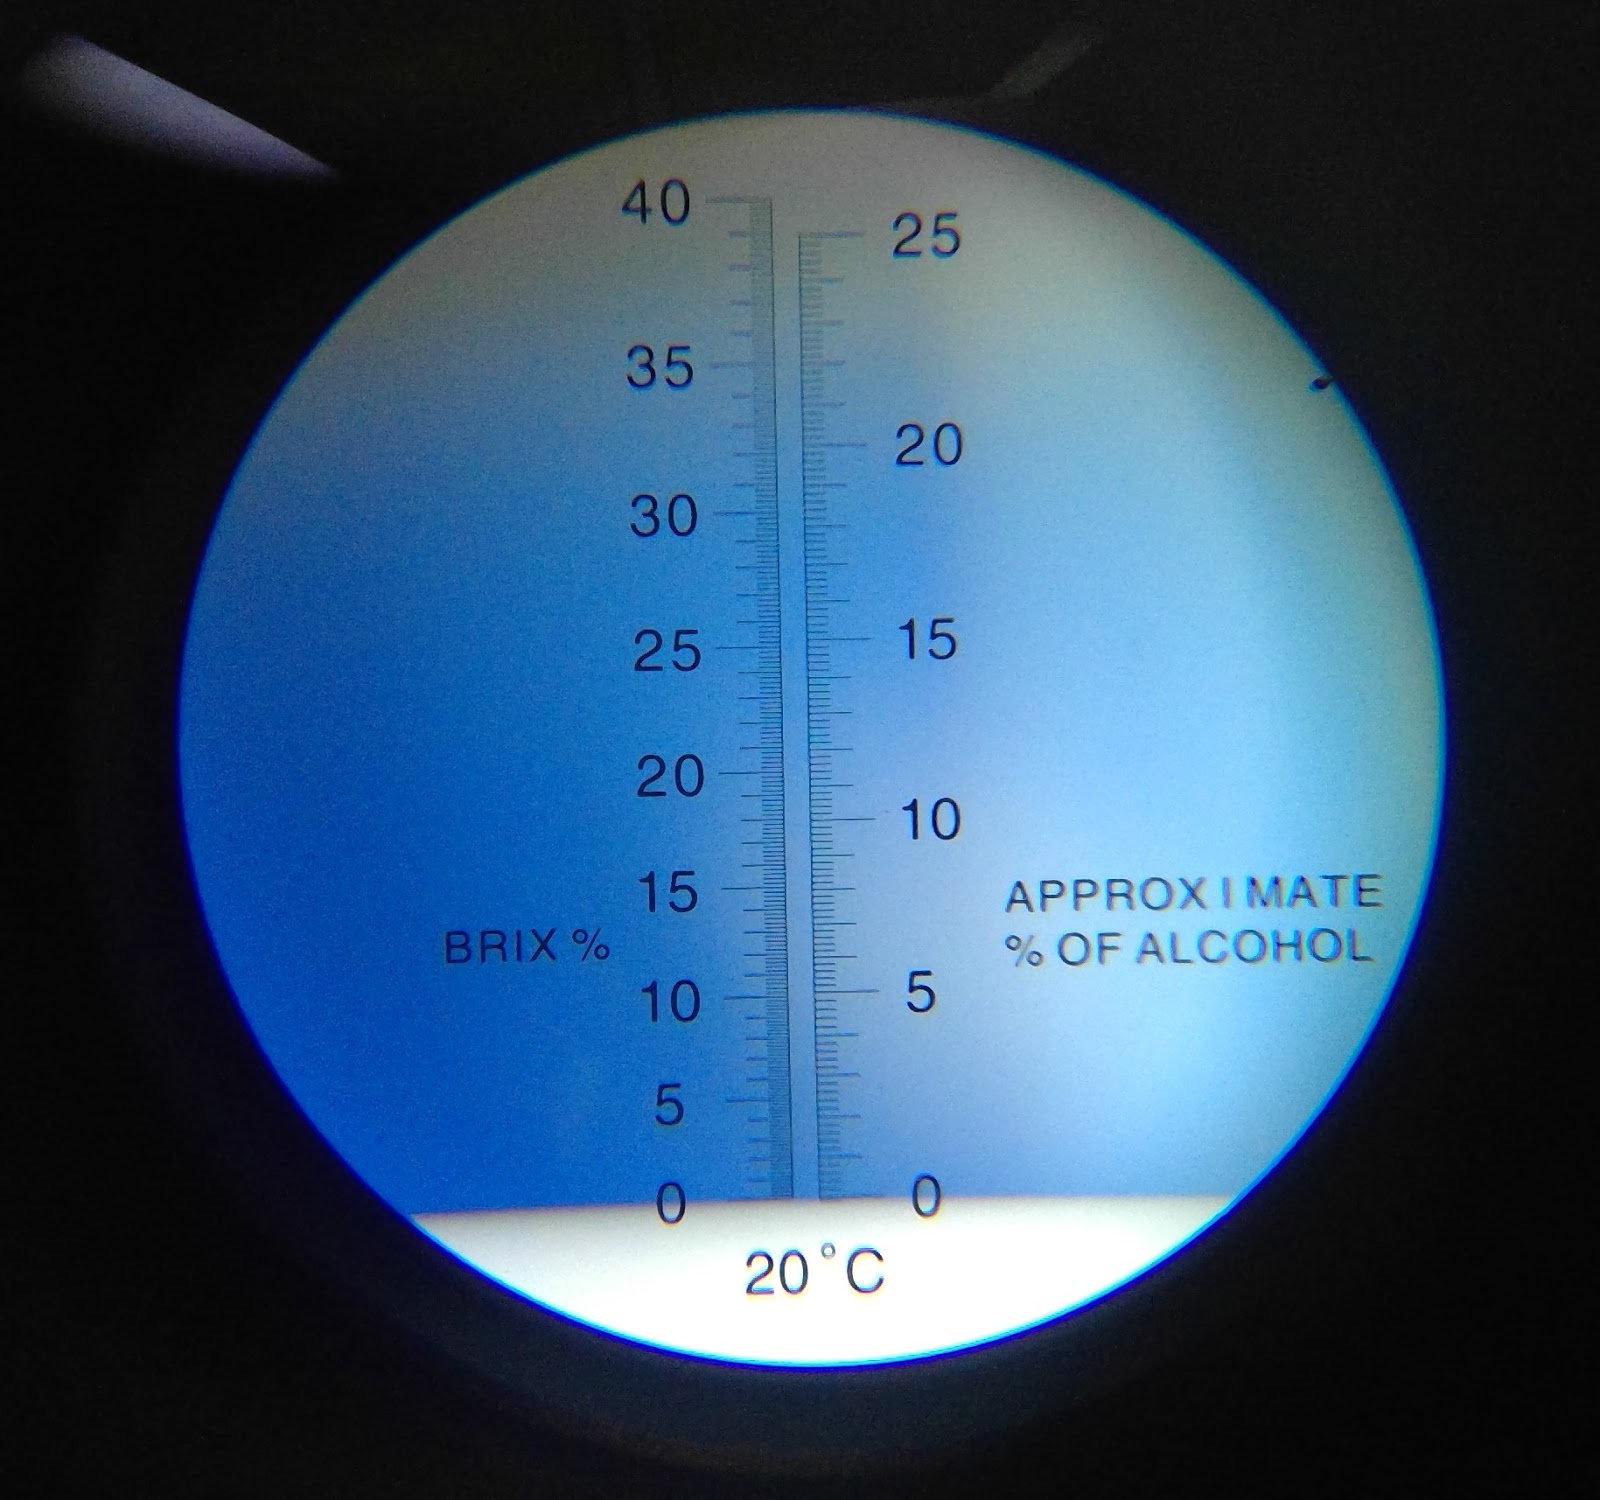
Refractometer Brix scale with water on the prism.
(Photo obtained by placing the eyepiece up to the camera on a MS Surface tablet)

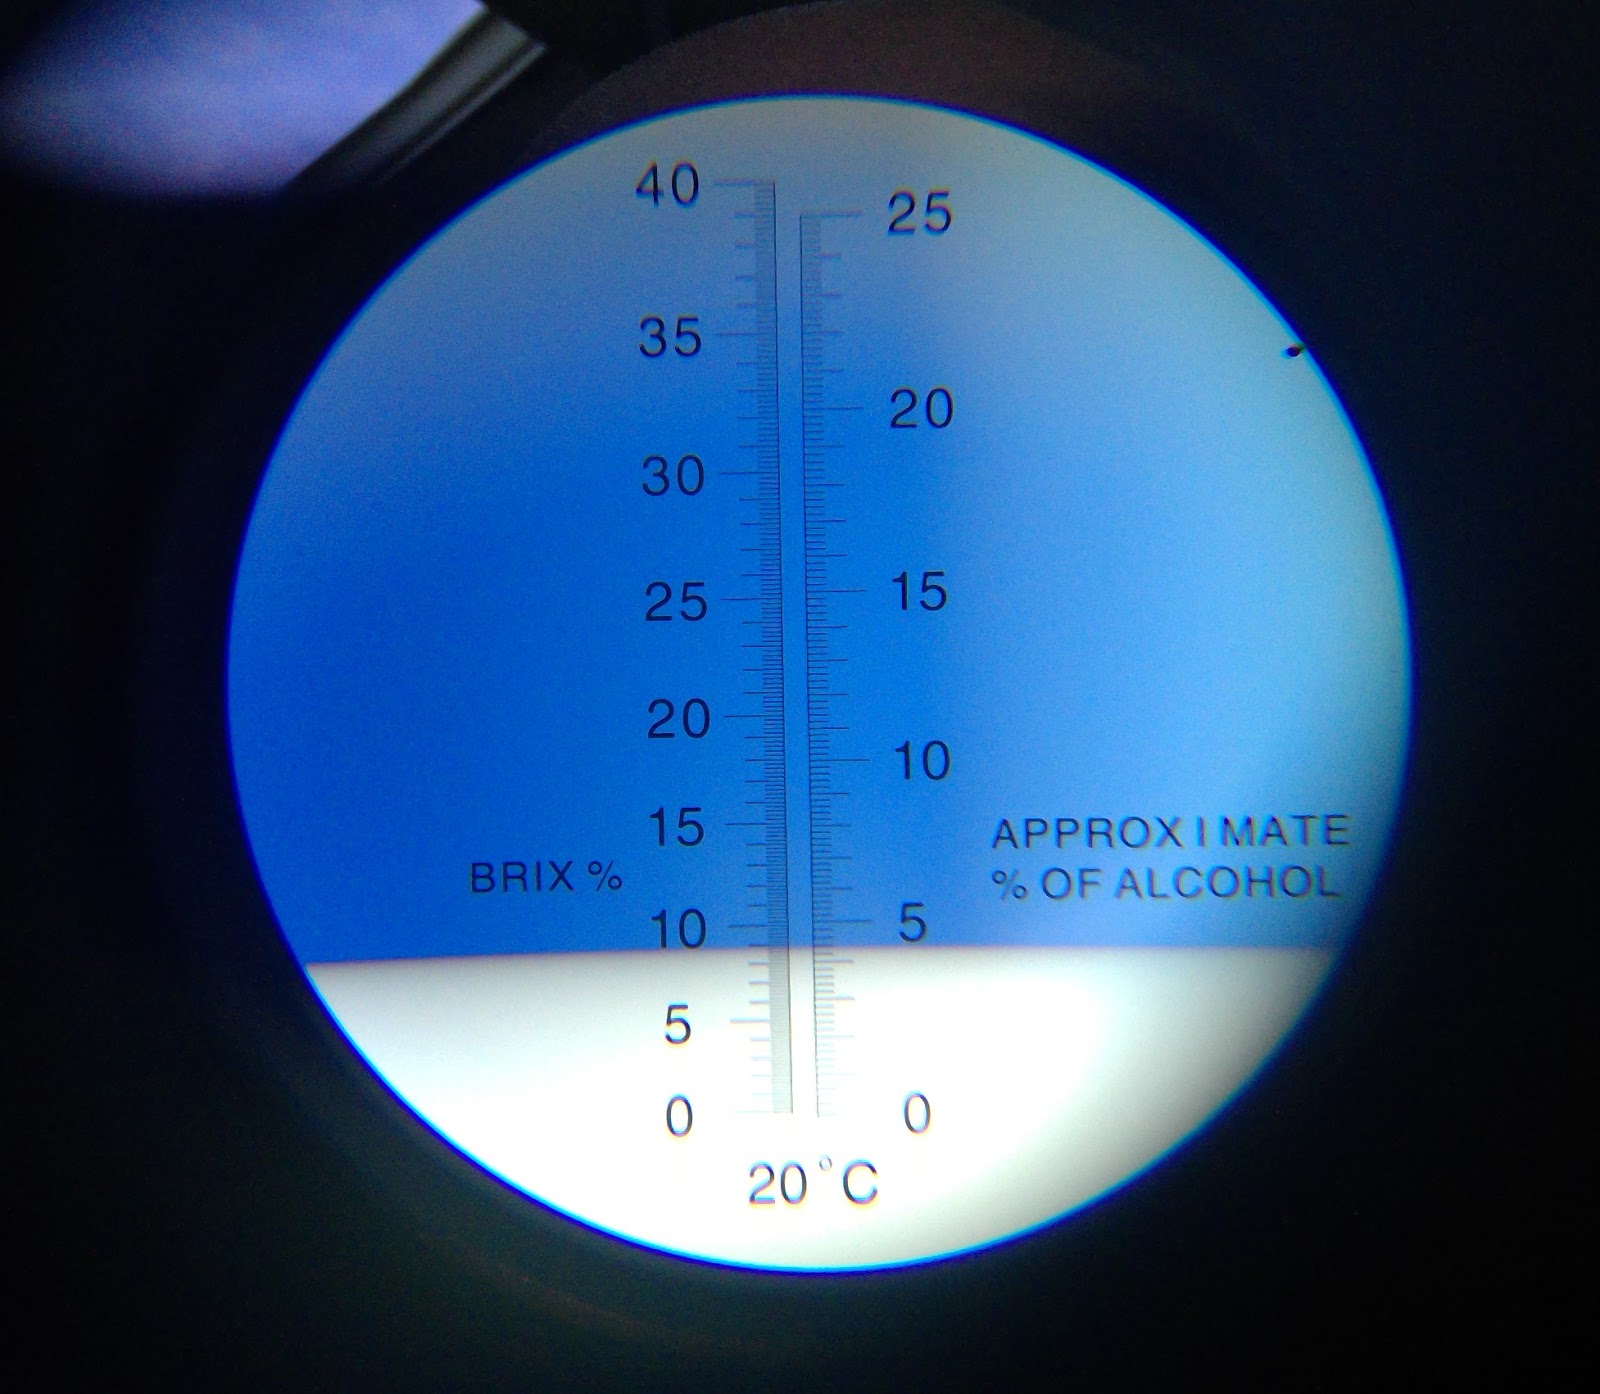
Refractometer Brix scale with freshly pressed apple juice (for cider, of course!)
My first use of the refractometer was in preparing a batch of cider. I decided to use the same 'recipe' as a batch from last year, which I'm going to name "Christmas Cider" (see recipe at the end of this post). That batch of cider was delicious and I wanted to reproduce it. The refractometer comes in handy because I diluted the apple juice by a factor of two with water, and then adjusted (increased) the sugar content in order to get enough alcohol. By having a quick & easy way to measure Brix with a refractometer, this sugar adjustment was painless compared to repeatedly measuring s.g. with a hydrometer. The readings were precise in the sense that they did not fluctuate during the reading (unlike a bobbing hydrometer!) or between readings of the same sample.

The one big limitation of measuring the index of refraction is that it's only really useful for measuring sugar content before fermentation starts. When fermentation starts, the sugar concentration decreases, and alcohol increases. Alcohol, just like sugar, increases the index of refraction. That means that the n measurement is no longer proportional to sugar concentration. Rather, n is affected by sugar and alcohol concentrations. Apparently there are online calculators that allow you to calculate sugar and alcohol concentrations from a mid-fermentation refractometer reading, so long as you know the starting Brix. This sounds fine in theory, but I have a bias against "black box" calculations like that. Even though it's a chore, you are probably going to get a more reliable measure of fermentation progress from a direct measurement of s.g. with a hydrometer. Give me the choice, and I would rather have a direct measurement than a value from a black box. That being said, it would be interesting to compare s.g. measurements with corrected refractometer readings using an online calculators.

From a quick survey of YouTube videos on refractometers, it seems that a number of home brewers like to use refractometers when they are making up their wort, and then they use hydrometers once fermentation is under way. This makes a lot of sense.


Christmas Cider

1.5 gallons freshly pressed apple juice
1/2 tsp peptic enzyme
2 tsp yeast energizer
3 crushed Campden tablets
1.5 gallons water
approx. 3 cups granulated sugar
1 packet of champagne yeast (Lalvin EC-1118)
1 tsp. nutmeg
5 cinnamon sticks
3/4 cup dextrose (priming sugar)

Instructions*:
Add peptic enzyme, yeast energizer, and Campden tablets to the apple juice and let it sit in the closed primary fermentation bucket for 24 hours. Then, add water and stir thoroughly. Add sugar in 1 cup increments, stirring thoroughly after each addition, and measure Brix with a refractometer until Brix = 9. (If measuring s.g. with a hydrometer, aim for s.g. = 1.035 - 1.040.) Sprinkle yeast on surface of the juice and close the lid loosely on the primary (you can also use a primary with airlock). When the foam collapses, siphon the cider into a sanitized 3 gallon carboy for secondary fermentation. At this point, add the nutmeg and cinnamon sticks. Seal the carboy with an airlock. When fermentation is complete, siphon the cider into bucket and mix in the dextrose (1/4 cup per gallon of cider). Bottle in beer bottles and seal with bottle caps.

*Note: This is a customized version of the apple cider recipe in the Winemaker's Recipe Handbook, known as the purple booklet


Saturday 29 July 2017

Hops - Fast Growth and Early Signs of Cones

Lesson: Hops grow awfully fast. Back in early June, I planted two Golding Hops plants, and posted a picture (Hops in the Garden). That was about seven weeks ago. Those little plants now look like this:


As you can see, I attached heavy garden twine to the downspout on the eaves trough so the hops could grow upwards. It's been fun to watch the hops bines wrap themselves around the twine as they grow. I have also been watching carefully for any signs of the beginnings of cones. Today, I took a close look and discovered many clusters of little 'burrs' on one of the plants. These burrs, I understand, grow into the cones that we harvest. So, this is exciting. Given all the little clusters on this one plant, I think there should be enough hops for batch of home brew.

Cluster of Pre-Cone Burrs on a Hops Plant 


Thursday 20 July 2017

Mead - Final Product One Year Later

Way back in October 2016, I was frustrated with stuck fermentation on a batch of mead. Adding yeast nutrient/energizer, fermentation seemed to do the trick. Three months later, in January, I measured the specific gravity (0.996) and decided to rack it. Some residual haziness remained, so I let this mead sit for 7 months in the dark, in a sealed carboy, hoping that this little bit of cloudiness would settle out. Last week, I decided to rack again, and maybe bottle it.

During the racking, I took pains to avoid bumping the walls of the carboy with the auto-siphon, as fine particles had settled there. I also left avoided siphoning off the bottom inch (or so) of liquid, thus avoiding most of the fine sediment. The racked mead seemed to not have any visible particulates, although there was still a fine haze. I decided that it probably wasn't going to get much better by letting it sit for another half a year, so I went ahead and bottled. And, frankly, the minor haziness is something I can live with.


Minor haziness is most visible in full sunlight.

The final specific gravity was 0.994, slightly lower (but within experimental error) than the s.g. in January. Total yield was 14 bottles, plus another 300 mL or so that I put in the fridge for immediate consumption.

So, is it any good? Well, yes. This mead is far better than the my first attempt, which was made using some generic honey from Costco. This one has more interesting, complex honey flavours, and it tastes 'clean'. It is also very dry and it's delicious when chilled - a perfect summer treat.


Monday 12 June 2017

Hops in the Garden

I am now growing hops in my garden. This is with the goal of eventually making beer directly from the four basic ingredients (water, barley, hops, and yeast), using fresh hops grown in my own garden.

The inspiration for this goal comes from a few places. It started with the 2014 book "The Perfect Keg" by Ian Coutts. This is a fun Canadian work of non-fiction in which the author documents his attempts to grow his own barley in order to make beer from scratch, at the same time learning various brewing tricks from master brewers. It's a fun read. Coutt's desire to start from scratch is something that I understand, and kudos to him for pursuing that.

For some time now, I have enjoyed a range of YouTube videos on home brewing. These have fired up my interest in all-grain brewing (i.e. starting from barley itself). At some point, I will post links to some of the more interesting videos I have seen.

In early May, my wife and I attended a free seminar on growing hops at the Enjoy Centre, here in St. Albert. The seminar was run in part by the proprietors of Northern Girls Hopyard. They even brought along some hop plants for sale. At that time, they only had Cascade and Centennial hops, which, I understand, are used mainly in brewing IPAs. So, I separately ordered two Golding hops plants from them and picked them up two weeks ago.

I re-potted the hop plants in large planters. Why not in the ground, you might ask? The answer is that I was warned by a friend who has previously grown his own hops that they basically start growing everywhere. Hops propogate through rhizomes (i.e. the roots grow and send up new shoots), which means that you need to manage them. Putting the hop plants in a container seemed like an easier option.


The Northern Girls recommend the use of twine for the hop 'bines'. This requires hanging the twine from some kind of overhead point of contact, which was not practical. So, I tried a bamboo pole instead of twine. Fortunately, the hops have taken to this perfectly, with a tiny bit of training at the beginning:

Hop plant growing clockwise up and around bamboo.
I'm looking forward to seeing how the hops turn out. They are certainly growing quickly.


Saturday 10 June 2017

Czeck Pilsner & Red Ale

Over the last three months, I made two beers from kits. The first kit was a Czeck Pilsner wort kit by Festa Brew. The second was a Red Ale kit by Brewer's Best.

Festa Brew wort kits are quite easy, but I kind of wonder about the final quality given just how long the bags of pasteurized wort might be sitting on the shelf before you purchase it and take it home. When I bought this Czeck Pilsner kit from Estate Brewing in Edmonton, the owner told me that it was a very popular kit and his stock was being sold quickly. In the end, it turned out to be a nice beer, but I'm not convinced it's much like actual Czeck pilsners like Pilsner Urquell. The main difference, to me, is that the kit beer has much more citrus flavour.

Needing a new challenge just to keep my interest, the next kit I bought was an ingredient kit from Brewer's Best. The kit included malt extract, malted barley, freeze dried hops, yeast, priming sugar, and bottle caps. In order to make this beer, I also needed some new equipment - in particular a 6 gallon stainless steel kettle, which is basically a gigantic pot.

Brewer's Best beer ingredient kit.


This was the first time I have made beer from an ingredient kit, and it was a lot of fun. After the usual sanitization, the process consisted of bringing 3 gallons of water to 150 oF, steeping malted, crushed grains (in a bag), bringing the wort to a boil, adding liquid malt extract, and then adding two different types of hops (Golding and Willamette) at specific times. After the hops were added, their aromas began to fill the entire house, which resulted in my kids all separately asking, "what's that smell?" (Nobody was complaining, it's just that nobody had smelled anything like it before!)

The biggest challenge was trying to cool the wort down to room temperature after the boil. I had not invested in one of those coiled wort chillers, so I had to resort to taking the kettle outside and placing it in a pile of snow. (Yes, we get snow in April in Edmonton.) It took about 2 hours to get the temperature down to, which seems way too long. I need to buy a wort chiller.

After that, I added water to bring the total volume to 5 gallons, pitched the yeast, and the fermentation started up right away. After 3 days, the foam head had collapsed and I siphoned the beer into a carboy. After 12 days in the carboy, and noting that specific gravity was not changing, I proceeded to bottling. This meant transferring the beer to a large bucket, mixing in the priming sugar, and then filling and capping bottles.

Three weeks later, I tasted this Red Ale and I was floored. First of all, I have to characterize the taste as distinctly "fresh". There are just no off-flavours at all. For example, many commercial beers (especially from cans for kegs) have a metallic tinny taste that kind of ruins it. Other beers can develop skunky flavours that arise from photochemical reactions in the beer, especially when the beer is in clear bottles. And sometimes there are flavours that make me think the beer has just been sitting around too long. This beer came out fresh, and it's certainly fresher tasting than any of the beers I have made from wort kits.

Second of all, as described on the kit label, this beer is "smooth and easy drinking", a "balance of caramel malts and specialty grains", with low hop bitterness. I am not a fan of many IPA's, but I do enjoy beers that have complex caramel flavours that come from malted grains. So, this beer suits my tastes just about perfectly. I have told friends that this is the best beer I have ever tasted, which might seem like an exaggeration, but it's true for me. I will probably make this beer again, and it has me salivating over the possibility of making beer from your own malted grains.

Saturday 14 January 2017

Peach Melomel - Tasting & Bottling

Three months have passed since I racked the peach melomel to let it clarify. Passive clarification was effective in this case. The melomel was crystal clear at the time of bottling.

I siphoned the melomel into a sterilized carboy, and stirred it vigorously for about ten minutes. This was to remove residual carbon dioxide. I actually did a taste test before and after stirring, and it was easy to detect the reduction in carbonation. I also took a specific gravity reading, and found it unchanged from the previous measurement.

Bottling was a snap. The three gallon batch is a good size for my purposes. This yielded 14 (and half) bottles in the end. Some volume is always lost in the racking, but that's fine.


Bottles of peach melomel.

I like the taste of this batch. The taste is light and reminiscent to some dry white wines. It has a mild honey aroma, and the honey taste seems most noticeable at the front and middle. Then, a gentle fruit flavour emerges at the end. The acidity is just right. But the odd thing is that I have a hard time identifying a peach flavour!

Fruit flavours come from organic compounds called esters, and the pure compounds have very specific tastes and aromas. One of the fun things about esters is that they are easily transformed into other esters, under certain chemical conditions. That means you can transform an ester with one particular flavour into another ester that has a totally different flavour. All you have to do is mix up the ester with a little acid and an alcohol compound (the alcohol that we drink is an alcohol known as ethanol).

So, here's one hypothesis: peach flavour comes from "linalyl" esters. In the presence of ethanol and acid, these could be converted to the corresponding "ethyl" esters. The ethyl esters in question are present in bananas, lemons, pineapples, and strawberries. When I sip this peach melomel, I taste hints of all of these. (Caveat: this is just a hypothesis.)

Another, perhaps more likely, scenario is that the peach linalyl esters decomposed into carboxylic acids, which do not have fruit flavours at all. :(

"Peach" Melomel. More like "Fruit" Melomel.


Monday 2 January 2017

American Red Ale

Over the holiday break, I made a batch of beer from a kit. The "ReadyBrew" kit was manufactured by craft brewer Paddock Wood Brewing, Saskatoon (Hey, that's almost local for me!). According to the manager of the store where I bought it, Paddock Wood Brewing prepares fifty 23 L kits from every batch of their own beer. That's kind of cool!

The "kit" consisted of a boxed bag of 23 L of wort. That's all. (But, frankly, I didn't mind because nothing says 'serious' like a kit consisting of only one raw material. "You need to select your own yeast, buddy.")

A couple of days before Christmas, I started the fermentation. Within a day, there was quite an accumulation of foam - enough to push the lid off the bucket:

Uh oh!

While I didn't bother to take a picture of what happened next, I can assure readers that the foam created quite a mess, especially when it dried out. Fortunately, I put the entire primary fermentation bucket in a large plastic tub, which contained the mess. The excessive foam production did not last very long. Another day, and the foam had collapsed to a manageable level.

On Christmas Day, I took a few minutes to transfer the beer from into a sterilized carboy, and installed an airlock. And, today, January 2, 2017, I added priming sugar and bottled. I'm really looking forward to enjoying a bottle in a couple of weeks.

Happy New Year!